Monday, August 24, 2020

Different Phases of Azure Database Migration and Tools that help during Azure Migrations.

A successful cloud migration project implementation will not only save budget but it will also result in smooth operations post-migration. It is critical to plan and implement migration strategies after a thorough study.


In this article, we will discuss different activities involved in each of the migration phases and different tools that can be used to perform these activities. Please note this article is written keeping in mind MSSQL On-Premise database migration to Azure so the methods and tools mentioned in this article will be helpful for database migrations. Few of the tools discussed in this article can be used for performing many other activities like monitoring, analysis, and so on but the other features of the tools are not discussed here.


An Azure migration project involves many number of tasks that needs to be performed such as the gathering of information, validation of source databases\servers, cost analysis and so on. Azure migration project activities can be mainly divided into 3 phases as mentioned below.


 1.   Pre-Migration Phase.

 2.   Migration Phase.

 3.   Post-Migration Phase.


1.   Pre-Migration Phase: 


This is the beginning phase of the Azure migration project and it is one of the important and strong pillars of a migration project. The successful execution of a migration project depends on how detailed and accurately this phase is executed. The main tasks of this phase are estimating the cost of Azure resources, gathering all details of the source servers that are required to be migrated, and to check if the source server/database can be migrated or not.


We can estimate the cost savings that can be achieved by migrating existing servers\databases to Azure, as discussed here.


The first task is to gather information about the source environment. For collecting information about source environment MAPToolkit is one of the free tools available. We have discussed in detail about this tool here. After gathering information about the source environment using MAPToolkit, the next step is to check if the existing source environment or the database(s) are ready to migrate to the cloud. As this article is written keeping MSSQL database migrations in mind, to assess the source databases we can use the DMA (Database Migration Assistant) tool. DMA is discussed in detail here. After assessing the source databases we will get details of which databases can be migrated and which can’t be migrated, which existing features of source environment are not in use in Azure, mainly we need to identify and fix the migration blockers in the DMA tool output. Migration blockers are the features or components that will block our Azure migration, these can be identified using the DMA tool. After fixing all the migration blockers only Azure migration can be performed successfully.


2.   Migration Phase:


In this phase, we will perform the actual migration of applications, servers, and databases. There are a number of methods and tools available for performing MSSQL database migration, in fact, there are various ways to migrate MSSQL database using SSMS itself. Based on the environment and customer specifications like the downtime allowed, the volume of data, budget, and so on,  the tools and methods of migration vary. There is no one fixed method of migration which suits for all environments and databases. There are different tools like DMS (Database Migration Service), DMA (Database Migration Assistant), Transactional Replication, and so on.


How we plan and perform a SQL Server Service Pack upgrade similarly once the type of migration and the tool for migration is finalized we first need to perform migrations of low-risk databases\environments like Test or Stage databases. Once we identify the challenges and fixes during the migration of test or stage databases then we need to plan for production database migration. Migrating less critical databases will give us a good estimate of how much time it takes to migrate, what are the challenges that may occur during migration, and which method would be best suitable for migrating the production database.


 3.   Post-Migration:


Once migration is completed the first step obviously is to validate the application. Once all validations are completed then the next step is to start tracking and monitoring the cloud environment.  


As one of the main advantages of moving to the cloud is to reduce cost, as we are billed 'Pay Per Usage', to take the full advantage of 'Pay Per Usage' we need to keep tracking our environment continuously and scale up and scale down cloud resources as needed. Continuous monitoring of the cloud environment helps in removing unused resources like unused storages,  unused snapshots, unused VMs, and so on. We should start collecting data points of the cloud environment using different tools available. After gathering multiple data points by monitoring the environment we can use those data points for optimizing and cost-saving in the environment.


Azure Monitor helps in monitoring and tracking of applications, infrastructure, and networks. The data gathered while monitoring can be used to perform several analysis and detecting problems. Log analytics can be used to perform in-depth troubleshooting and Applications Insight helps in working on application issues and dependencies. At the time of writing this article Log Analytics and Application Insights also falls under Azure Monitor. You can read in detail about Azure monitor here. 


Azure Security Center is a security management system that helps in assessing and alerting about security issues of our environment and resources. It helps in assessing the environment/workloads and gives us the current status of the security of our resources and provides suitable recommendations. You can read here in detail about AzureSecurity Centre.


Below picture shows different phases and steps involved in each phase of MSSQL database migration to Azure and different tools that will be helpful to perform different activities.


Stages of database migration to azure cloud


How to create an Azure SQL Database?

How to perform ONLINE migration of the database to Azure?

How to perform OFFLINE migration of the database to Azure?


Thanks VV!!


#Azuresql #Azuremigration #migration #SQLServer #Azure #MSSQL #Databasemigration #Database


Monday, July 13, 2020

How to collect information related to source servers before Azure migration?


While planning for a migration one of the important steps is to study and understand our existing source environment. We need to first understand whether our existing source environment is ready for migration or not, what issues we might face if we migrate, what dependencies we have between our servers and SQL instances\databases, what users permissions exist and so on. A careful study of our source environment helps in avoiding issues during migrations and even prevents issues that might occur after migration.

We already studied about DMA tool, this tool helps greatly in verifying and assessing the source databases and it will give us a detailed report of whether source databases are ready for migration or we need to fix any issues before migrating and so on. But we should remember DMA is not a tool for information collection.

Many clients manage inventory of the environments. For the people who are unaware of inventory, it is the collection of all the details of the environment like applications, servers, Hardware and Software details, database instances, database details, storage, and so on. Having an inventory helps in planning any migration activity smoothly because we will be well aware of our environment and we can plan the migration accordingly. This is true for any kind of migration not only cloud migrations. It is a time-consuming process to collect the information manually and consolidate it. Instead of collecting or fetching the information manually, we can use a tool called MAP Toolkit.

What is MAP Toolkit?

Microsoft Assessment and Planning Toolkit (MAP Toolkit) is a free Microsoft tool that can be used to collect, assess, and display the information gathered in report format automatically about our environment. This tool saves tons of time by fetching the information of all the servers in our environment automatically. We can use this tool to capture the performance metrics as well.

How to download MAP Toolkit?

It can be downloaded from here.

How to install Map Toolkit?

After downloading the exe from the above location, installing the application is quite straightforward and easy. Just double-clicking and clicking Next.

How to use MAP Toolkit?

After installing the tool click on the icon below:


Now once the tool will open the first step we need to perform is to give a name to our inventory database


Here I’m naming my database as “DB Inventory”


After naming the database, on the left side of the tool we can see different types of information we can fetch using the tool.


As mentioned earlier this tool is useful in fetching information about the entire environment but in this article, we will see how we can fetch information about SQL Server instances and databases within. So lets select ‘Database’ option from the left side of the tool


Next Click on the ‘collect inventory data’ option on the right side (highlighted in below screenshot) of the tool


Now the ‘Inventory and Assessment Wizard’ will open. Here we can select what different types of inventories we can collect. 


As we want to collect information specific to SQL Server, scroll down the list and select SQL Server and SQL Server with Database Details from the list.


Based on the scenarios we select above, the tool determines which different technologies should be used to collect different information. In the next window, we can select the ‘Discovery Methods’ like whether to use Active Directory, Windows networking protocols, and so on. As I’m running this on my local machine I will select the ‘Manually enter computer names and credentials’ option.


As we are aware we need some credentials to access servers, in the next windows we need to provide that credential information with which the tool can communicate with the servers in the network. We can choose different credentials for different technologies and if required we can validate the credentials using Domain controller.


Here I want to only one credential for all the technologies, so I’m mentioning as below


When we have multiple credentials in-place then in the next window we can prioritize the credentials for each technology like in which sequence credentials need to be used for each technology


In the next window, we need to specify the computer details for which we want to fetch the information and along with that, we can provide the credential to use.


Once we click on ‘create’, we can add the computer names and which credentials to use for the technologies. Here I’m using the same credentials.


Now in the summary window, we can see all the options we selected. Cross check and modify if any required.


After clicking on ‘Finish’ the tool will start collecting the requested information from the servers. We can see in the ‘Data Collection’ window which pops-up automatically.


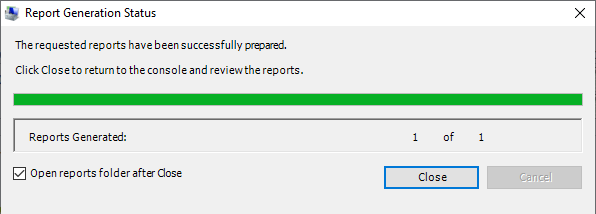
Once data collection is completed, click on close


Now once we go back to MAP Toolkit we can see the tool has identified 2 instances of SQL Server in my machine and their version is SQL Server 2017. Click on ‘Total count’.


Now we can see more information about SQL Server components in my machine. Like what all SQL Server components have been detected in machine


What editions are available


Now scroll up and on right side top corner we can see two reports available as shown in the picture below


Once we click on the required report, a report will be generated and saved as shown below


Once we open the report we can see entire information about the SQL Server environment. These reports will have detailed information about the SQL instances like components of SQL, their configuration, settings, database details, user details and much more. Below are a few sample screenshots.


Similarly, we can use this tool in collecting information about our entire environment during the planning phase of the migration.


Thanks VV!!


The habit of procrastination fatigues you more than the effort it takes to do it. - Shiv Khera

 #Inventory #migration #AzureSQL #Azure #SQLServer #MSSQL  #MAPToolkit #planning #Azuremigration

Monday, July 6, 2020

How to choose the target Azure SQL platform while migrating on-premise SQL Server database?


As part of database migration to cloud one of the important decision to make is which target platform to choose. As discussed in the previous article there are multiple options to choose from the Azure SQL family while migrating our on-premise SQL Server.  

Below flowchart helps in choosing the target Azure SQL platform from a database perspective by evaluating scenarios like if we want to migrate a single database or multiple databases, if want to use only database scoped features or we want to use instance scoped features as well, if we have any other applications that we need to migrate along with the databases, if we want the control of underlying instance and OS.

Remember target platform selection should not be decided solely based on the below chart, because choosing a target platform should not be done only by evaluating database features and dependencies. We also need to take into account many other important factors like infrastructure, application compatibility, support requirements after migration, business needs, cost, and so on. 


Azure Target Platform Selection Chart:

This chart helps as a starting point in deciding which target platform in Azure suits to your existing on-premise environment.

Note: This chart gives you only a high-level idea of which target platform can be selected, but many many other parameters need to be considered before finalizing the target platform. Please evaluate all the parameters as per your environment and decide the target platform.


Thanks VV!!


#azure #databasemigration #azuremigration #sqlserver #sql #dbmigration #Azure #AzureSQL