Friday, July 28, 2023

How to move a Database from one Azure SQL Managed Instance to another Azure SQL Managed Instance.

In Azure SQL Managed Instance we have the option to move the database between Azure SQL Managed Instances. It is quite simple to move the database from one SQL managed instance to another SQL managed instance. In this article we will see how to move or copy an sql managed instance database from one azure sql managed instance to another azure sql managed instance.


Login to the Azure portal and search for SQL managed instance.


Click on the SQL managed instance and the database inside the managed instance which you want to move. Here I have only one sample database named ‘WideWorldImporters’ once you click on the database you should see an overview page like below


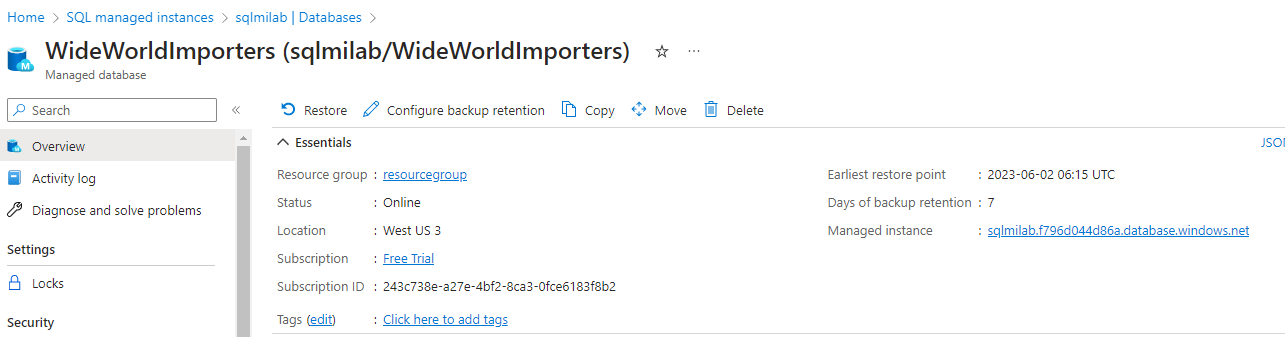
on the Overview page you can see several options and among them, there are 2 options COPY and MOVE. Copy is to copy the database to another subscription by keeping the original database in its source and move will move the database from the source location to the destination location.


Now click on copy and we should see a similar page like below. 


Here we can see source details like the source database, resource group, source sql managed instance name. After verifying all details Click on 'Next: Destination details' button.


Here we need to provide the destination resource group and the SQL managed instance.


After that once we click on ‘Review+Start’ the copy process will start and if any errors pop up we need to remediate those before copying can start.
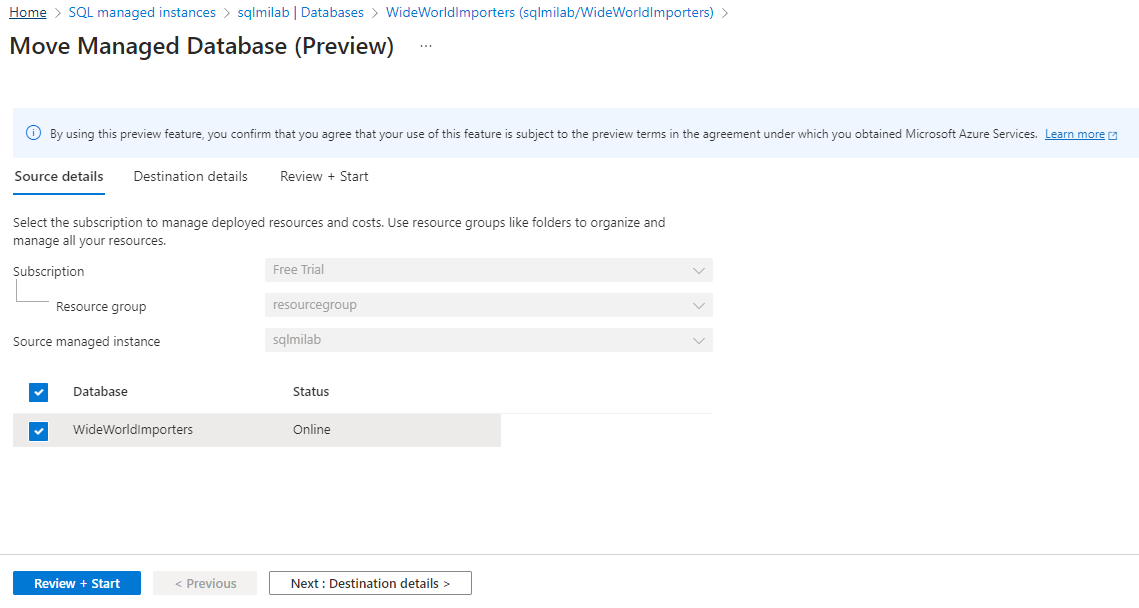


Similarly, we can also move the database by clicking on the MOVE button and selecting source and destination SQL managed instances and their respective resource groups and click on Review+Create as shown in below pictures.


Thanks VV!!


#sqlmanagedinstance #azure #azuresql #azurearchitect #cloudarchitect

Wednesday, July 12, 2023

How to share Azure compute gallery to all Azure users.

In the previous article, we have seen how to create an image of Azure VM. When we create an Azure VM Image it will reside in storage and can be used any number of times we want for the creation of identical VMs. But let’s say we want this VM Image to be available across the entire company or multiple subscriptions so that any authorized team in the organization can create new VMs based on the image. We will see in this article how to achieve this requirement.


In Azure, we have the option to share the images and Azure compute gallery to make them available for all the required resources. In the previous article while creating an Azure VM Image we first created an Azure Compute Gallery. This Azure Compute Gallery acts as a repository of all the images we create.


Note: Microsoft does not recommend sharing the VM images individually and only recommends sharing the Azure compute gallery. Hence in this article, we will see how to share the Azure compute gallery.


When we login to the Azure portal and search for ‘image’ in the search box, we can see ‘Images’, click on it


After clicking it will show us all the VM image versions


Click on the ‘1.1.0’ image version which we created in the previous article


And it will show the overview page of the image version


To find to which Azure compute gallery this image belongs to, on the right-hand side we can see ‘Azure Compute gallery’. Here we can see this image belongs to the Azure compute gallery ‘VMIG’. Click on the VMIG


That will take us to the overview page of Azure compute gallery VMIG and here we can see all the images that are in this gallery and the details of the image like OS type, OS state, and so on.


On the left side of the page, we can see a section named ‘Sharing’. Once we click on it, we can see different sharing options available


Based on our requirement we can select the type of sharing. I’m selecting ‘RBAC+ share directly’ and at the bottom, we can see ‘Tenants and subscriptions’ under this we can select to what all tenants and subscriptions we want this has to be shared. After selecting click on ‘Save’. Once settings are saved this gallery images will be available for all the selected subscriptions and tenants.

A Tenant in Azure is nothing but an instance of Azure Active Directory (Azure AD) which contains information like objects, users and groups about a single organization. It also contains access and compliance policies and its primary function is resource access management and identity authentication.


The gallery can be shared with individual users, groups, service principals, and all users of specific subscriptions or tenants and also can be shared publicly to all users in Azure. Based on the sharing type we select it will depend on to whom we can share. Example: In the above screenshot I selected ‘RBAC+ share directly’ so when we select this option the gallery can be shared to individual users, groups, service principal, and all users of specific subscription or tenant but we cannot share publicly to all users in Azure.


You can follow me on LinkedIn and Twitter for more articles.


Thanks VV!!                                                                                                                                                      

Tuesday, July 4, 2023

How to create our own VM image in Azure similar to Azure marketplace image.

We all know Azure marketplace have wide variety of images with different combinations like different OS versions, different OS+DB versions and so on. Let’s say we have a customer VUT and all the Virtual Machines created for this customer should have some applications running in them as per their policy or requirement and installing and configuring 100s of them takes some time. So instead of installing the required applications manually every time on all the VMs we can create our own VM Image just like Azure marketplace image and use our VM Image across the company to create new VMs which will have the required applications comes along with image.

Another use can be when we have to create multiple VMs with same configurations like OS disk or both OS and data disks we can use VM Image concept in Azure. This helps in scenarios like all the VMs in an environment should have similar configurations for example all the test VMs should have identical configurations then instead of creating each VM manually and configuring them we can use VM Images.

How to create a Azure VM Image.

In this article we will see how we can create VM Image and in the next article we will see how an VM image can be shared across all the subscriptions of an organization.


  1. Login to Azure portal and search for ‘Virtual Machine’


  1. Select the VM for which you want to create an image. In my case I want to create an image for virtual machine named ‘VM1’.


  1. Click on VM1 and you can see settings of VM1. In the same ‘Overview’ click on ‘Capture’


  1. ‘Create an image’ page will open and here enter Resource group details where you want create the image and select ‘Yes, share it to a gallery as a VM image version’.


  1. We can store the images in a Gallery which helps in sharing the image across the company and across the regions. This gallery in simple terms acts as a repository.


Create an image gallery to store the VM image. If gallery doesn’t exist already in the resource group click ‘Create new’.


  1. Give ‘VMIG’ as image gallery name and click ‘OK’.


Note: Please remember the warning sign in the above screenshot. Once we capture image of a VM the VM will become unusable.

  1. You can check the option ‘Automatically delete this virtual machine after creating the image’ if you want to delete the source VM once the image creation completes. But it is recommended to have the source VM in place even after image creation.


  1. Azure compute gallery supports 2 Operating System States. Generalized and Specialized. Generalized means the machine and user specific information will be removed from the VM before creation of the image and in Specialized state this information will not be removed. Both the options have their own advantages and disadvantages. Specialized state will not have osprofile in it, osprofile helps in passing sensitive information to VM via secrets but advantage of specialized VMs is they can start and run faster than the Generalized VMs. So as per your requirement you can choose suitable option.


Here I select Operating system state as ‘Generalized’.


  1. Create VM image definition at ‘Target VM image definition’. Here I’m giving name as ‘VM1Image’. Select publisher and other details as shown below and click ‘OK’.


Image definition basically will have details about the image like OS details, SKU details, VM generation and so on. This information helps in logical group of images and also helps the user who is using this image to identify the type of image being used.


  1. Under Version details, we can give ‘Version number’ for the image, I’m giving as 1.1.0 and leaving other details empty.


Versioning of image helps in segregating the images. For example, we can have dedicated version for all production images, another dedicated versioning for development images. Also, versioning helps in identifying the older and newer versions.


  1. ‘End of life date’ this option helps in making user aware if the image they are using is latest one or old one. VMs can still be created after the end-of-life date of the image but it will act as an indicator for the user to know the image is outdated. I’m leaving this as empty.


‘Shallow replication’ option creates the image faster as it will not copy the image. This option can be selected if VMs have larger disks as image gets created faster but you can’t deploy large number of VMs concurrently if this option is selected. It is recommended to check this option for development and test environment. I’m leaving this option unchecked.


  1. We can copy the image we are creating to multiple regions using ‘Replication’ option. To how many regions we want it to be replicated and to which regions it has to be replicated can be configured under ‘Replication’.


Under ‘Replication’ I’m giving  ‘Default replica count’ as ‘1’ and selecting ‘(Asia Pacific) Central India’ so the image will be replicated to this region.


  1. Now click on ‘Review+Create’.


  1. Wait for the image to be created.


  1. Once the image creation is completed click on ‘Go to resource’ it will take us to the image we created.


  1. In ‘Overview’ section of the image you can see 2 options like ‘Create VM’ , ‘Create VMSS’. We can use these buttons to create a new VM or VMSS using the image we created. Click on ‘Create VM’.


  1. If we click ‘Create VM’ it opens ‘Create a virtual machine’ page and here if you scroll down you can see under ‘Image’ section the image we just created already selected.


  1. You can fill the other details and simply click on ‘Review+Create’ and a new VM gets created which will have same configuration as the image we used.


Hope this article helped in learning how to create our own VM image in Azure similar to Azure marketplace image. Share your inputs in comment section below.


Thanks VV!!