As discussed earlier there are different methods of performing both ONLINE\OFFLINE database migrations. When we need to migrate databases with minimal downtime we will opt for online migration. In
this article we will see how we can perform online migration of an on-premise SQL
Server database to Azure SQL Database using Transactional Replication.
Below
are the steps we will follow for migrating the database:
·
Create
an On-Premise SQL Database.
·
Create
Transactional Replication between On-premise and Azure SQL database.
·
Verify
all the objects migrated to Azure.
·
Remove
transactional replication.
Create an On-Premise sample SQL Server Database:
All the sample databases which we can use for testing and learning can be downloaded from here.
Change
the database owner of the on-premise database ‘AdventureWorks2017’ to ‘sa’
Create
Transactional Replication between On-premise and Azure SQL database:
Before
configuring replication between on-premise and Azure SQL database we should
keep in mind below are the limitations as of till date:
·
Only
Transactional Replication and Snapshot Replication can be configured between
on-premise and Azure SQL database. Other types of replications are not
supported.
· The On-premise database acts as both publisher and distributor.
·
Subscriptions
should always be PUSH SUBSCRIBERs.
·
Replication
can only use SQL authentication to connect to the Azure database.
·
Replicated
tables must have a Primary key.
Connect
to the on-premise SQL instance. Expand the ‘Replication’ tab and right-click on
‘Local Publications’ and select ‘New Publication’ as shown below:
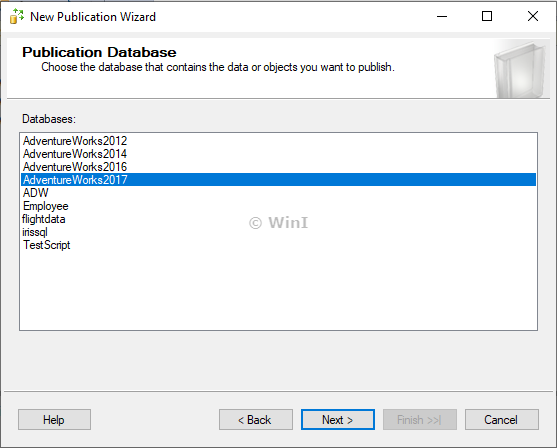
Select
the database “AdventureWorks2017” which we want to replicate to Azure.
Select
‘Transactional publication’ and click on ‘Next’
Now
select the objects that need to be replicated. Here we will replicate
only 5 tables of ‘AdventureWorks2017’
database instead of all the objects. After selecting all or required objects click on ‘Next’
In
next window we can select the rows of a table that we don't want to replicate, we will not filter any rows and click on ‘Next’
In
this window select ‘create a snapshot immediately’ option and click on ‘Next’
Click
on ‘Security Settings’ and as this not a production environment I will select ‘Run under the SQL Server Agent service
account’ and in the ‘Connect to the
Publisher' section either we can impersonate the account or use an admin login.
I have created an administrator SQL login named ‘azureadmin’, so I will use the
same
Select
‘Create the publication’ and click ‘Next’
Give
the publication a name and click on ‘Finish’. For easy identification, I am using my database name itself as a publication name also.
Now
right-click on ‘Local Subscriptions’ and select ‘New Subscriptions’
in next window select Publisher and the publication created earlier
Select
‘Run all agents at the Distributor’ and click ‘Next’
Click
on ‘Add SQL Server Subscriber’ and enter the azure connection string on which
we have the empty database created with the admin login credentials
Even though the connection string we provided is correct, we may receive below error after clicking on 'Connect'
Here
the issue is we need to include ‘secure’ in the connection string like below
Now
we should see ‘AdventureWorks2017’ database under ‘Subscription Database’ and
Click on ‘Next’
In
this window click on the 3 dots and select the required options for
Distribution agent and Subscriber as below
In ‘Synchronization Schedule’ we can select ‘Run on-demand only’ and click Next
Next
select ‘Immediately’ for ‘Initialize when’ option
Select
‘Create the subscription(s)’ and click on ‘Finish’
Now
we can see replication set up completed successfully.
Now connect to the Azure SQL database server using the connection string and check we can see all the selected objects have been replicated to the Azure SQL database. Here I have connected to the azure instance using SSMS.
Now
after making sure all the objects got replicated to Azure then we need to
divert the application connections to point to the Azure SQL database instead
of the on-premise database. Once the connections are diverted then we need to
validate all the transactions got replicated successfully. Once we are sure
everything got replicated then we can disable the transaction replication on
the on-premise database.
As
we can see in the online migration, the duration the database will be
unavailable is during the time when application connections are being diverted
from on-premise to Azure.
In next article, we will see how to migrate an on-premise SQL Server database to the Azure SQL database using offline migration.
Thanks
VV!!
#azure, #azuresqldatabase #databasemigration #cloudmigration #sqlserver #onlinemigration


Thanks for your time. It was much more beneficial.
ReplyDelete