Monday, May 25, 2020

How to install and use Azure Data Studio (ADS)?


In previous article we discussed what is Azure Data Studio (ADS), its uses, and when to use SSMS and when to use ADS. 

We can download the latest version of SSMS from below link:

https://docs.microsoft.com/en-us/sql/ssms/download-sql-server-management-studio-ssms?view=sql-server-ver15


In this article, we will see how to install ADS and few features of ADS.

How to Install ADS:

ADS installation is simple and straightforward. It is free to download the setup file from here. As of today below version of the file will be downloaded for the Windows machine.


Once the file is downloaded, double click on the exe and accept the license and proceed clicking 'Next' and finally, click on 'Install'.


After successful installation, go to Start and open ADS by clicking on the below icon.


Below is the welcome page of ADS at the time of writing this article.


If you see below pop-up to enable preview features or not, click on 'Yes'. So that we can view and make use of the preview features also.


There have been changes to the ADS layout recently and below is how the new ADS the welcome screen looks like:


Changing the look Of ADS:

We can change the color Theme as shown in below snippet: Here I am changing the color theme of my ADS to 'blue'


Viewing and Modifying Keyboard Shortcuts:

In the below snippet, we will see how to view the Keyboard Shortcuts of ADS and how we can modify the shortcuts. 

Below I’m modifying the shortcut for the “comment” line in code. The default shortcut for commenting out a line in code is “Ctrl+k Ctrl+c”, I am modifying it to “Ctrl+L Ctrl+C”


With the new update to ADS, we can view these ‘Color Theme’ and ‘Keyboard Shorcuts’ under ‘File’ as shown below:


Run the first query in ADS:

Now let’s run a simple query and will see how we can convert the output to a chart easily. On the welcome screen click on “New Query”


Or we can open ‘New Query’ like below:


This opens a new query window. First, we need to connect to a server for that click on “Connect”


Connecting to Instance:

Now enter “Connection Details”, here I want to query data from my Azure database so providing my Azure database connection string in “Server”, Authentication type “SQL Login” and its credentials. After providing all details click on “Connect”. The way to connect to an on-premise instance also similar.


Now the connection will establish to the Azure database. 

Let’s run a simple query on "SalesLT.ProductCategory" this is one of the tables in my “ADW” database.

“select * from SalesLT.ProductCategory”

Select ADW database from the drop-down list in “Change connection”, if it is not already selected.


Write the query and click on 'Run'. After clicking on “Run”, we can see the output of the query


On right-hand side, we can see different icons, each of them helps in saving the query result to CSV, Excel, JSON, XML.


Convert OutPut To Chart Format:

On the right side of the “Results” window, we can see the icon as pointed below,


Clicking on it will convert the query output to a chart.


There are different types of charts available and based on our requirement we can select each type of chart like Pie chart, table format, Doughnut, and so on.


Convert OutPut To 3D Visualization:

Now to visualize the data in 3D format, go to the home screen in ADS, and click on “Extensions”.


Or use shortcut “Ctrl+Shift+x” to open ‘Extensions’

We can see different extensions that are available to install. In ADS we get a lot number of “Extensions”, these extensions help in adding more features to ADS. For example, by default, we cannot see SQL Agent Jobs in ADS, so if we want to see SQL Agent jobs in ADS we need to install an extension named “SQL Server Agent”, after installing this extension we will be able to see SQL Agent jobs in ADS. Similarly there are many useful extensions that can be downloaded instantly. Another good thing about these extensions is we can either disable or uninstall these extensions if we no longer require those.

For converting the query outputs to 3D charts we need to install an extension named “SandDance”. To install it in the extension search box type “SandDance” and click on install.


It will get installed immediately, now open a new query window by pressing “Ctrl+N”

Run the same above query again and in the” Results” window we can see on the right side a new icon appears


Clicking on that icon will convert our output similar to below
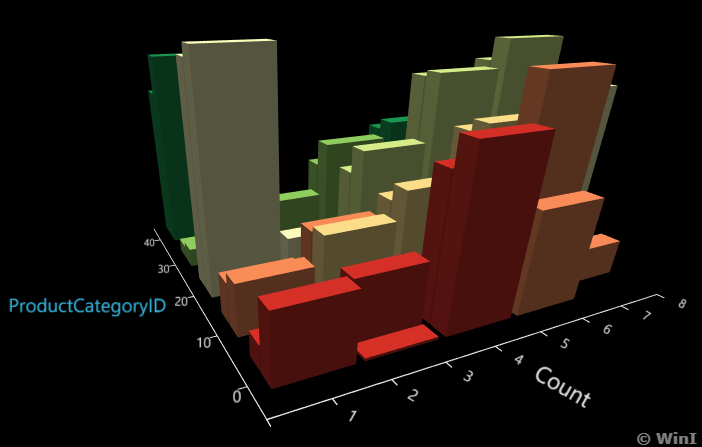


Now Click on the highlighted cubicle icon 


and select the values for “X Axis:” as “Name”, “Z Axis:” as “ProductCategoryID” and “Color by:” as “Name”


Now the output should convert as below


Same way we can convert the output into different 3D charts available.


There are many other features of ADS like the creation of custom Insights, source control, server groups, and so on.


Let me know which feature you like in ADS in the comments section below.


Thanks VV!!


#SQL #SQLServer #SSMS #ADS #AzureDataStudio #SQLServerManagementStudio

Monday, May 18, 2020

What is Azure Data Studio? Should we use Azure Data Studio (ADS) or SQL Server Management Studio (SSMS)?


Azure Data Studio:

Azure Data Studio (ADS), is a Microsoft tool developed for use across different platforms. ADS can be used in Linux, macOS, and Windows. The main purpose of ADS is to execute and edit queries. ADS has in-built features to perform several tasks very easily like output charts, visualizing outputs, exporting outputs to CSV, JSON, and so on, which are not so straight forward via SSMS. Through ADS we can connect to on-premise instances, Azure instances, and SQL 2019 Big-Data Clusters. ADS have several in-built InSight widgets and we can develop our own InSight Widgets as well. InSight Widgets are customizable charts and graphs which we can add to monitoring dashboards.


Do we need SSMS still? Will it be discontinued?

As a Database professional I have been using SSMS for many years for managing SQL instances. When I first heard of ADS my main question was “Is Microsoft planning to discontinue SSMS?”. After studying about ADS, as of today, my answer is “NO”. ADS does have all the advantages mentioned earlier but for performing administrative tasks, performance tuning, and configuring security features we can do only through SSMS. Also, we can use SSMS for managing both on-premise and Azure instances.


What to use: SSMS or ADS?

Both are useful for different reasons. For performing DBA activities we need to use SSMS only. For many administrative tasks like AlwaysOn, Export\Import, Database Engine Tuning Advisor, SQL mail, Replication, and many more tasks we need to use SSMS. ADS can be used to work mainly with queries, if we need to see query outputs in charts, export outputs to XML, JSON, CSV files, to work on SQL 2019 Big Data Cluster and for HDFS integration.


Sample Visualization that can be done in ADS:


We will see how a simple select query “select * from SalesLT.ProductCategoryrun on sample AdventureWorksLT database can be visualized in ADS.


Below is the output of the query in SSMS: 


With a single click in ADS, the same output can be viewed in a Grid format as shown below. There are many different formats like Grids, Stacks, Scatter, and so on.


In the next article, we will discuss how to install and use ADS.

Let me know in the comments section below if you started using ADS and what is the best feature you like in it.


Thanks VV!!


#SQL #SQLServer #SSMS #ADS #AzureDataStudio #SQLServerManagementStudio

Monday, May 11, 2020

How to run Python scripts in SQL Server: Part -2.


Brief Recap:

In the previous article, we have discussed how we can execute Python scripts from SSMS directly. We have discussed what installation steps we need to follow, what configuration changes we need to make, and how to run a simple Python script in SSMS. We mainly discussed how to use the procedure ‘sp_execute_external_script’. In this article, we will see how we can run Python scripts on data residing in SQL Server through a client.

Setup of Client:

A client in simple terms is a computer that uses the resources of a remote computer. One good example is ATMs, ATMs we use are clients, and once we request any action like to check account balance this client (that is ATM) will interact with Bank’s servers and process our request and give us the information requested. Same way here we will see how we can execute a python script from a client on SQL Server data. So first we need to set up a client-server environment.

Installation of Client:

When we select the Machine Learning Service option (as described in the previous article) while installing SQL Server, all the required Python libraries for SQL Server gets installed automatically. Now to set up the client, we need to install “revoscalepy” package. “revoscalepy” is one of the modules of Python which contains several functions, these functions are useful in performing actions like importing, transforming, and analyzing normalized data. A lot more also can be done using this module but we will stick with querying SQL Server data from python client. There is another module named ‘microsoftml’ as well for python which we can use and the functions of this module are mostly used in machine learning algorithms.

We can download the installation script from here:  "https://aka.ms/mls-py(This location is provided by Microsoft in this article.)

After downloading the script, open PowerShell as an Administrator, in PowerShell window, go to the folder where the above script has been downloaded. I have downloaded it to ‘C:\Temp’ folder, so in PowerShell, I went to that location and ran below command which installs the package.


If your PowerShell execution policy is set to Allsigned or Remotesigned then you will receive below error once you run above command. What it means is your PowerShell script is not signed by any trusted publisher. To overcome this error we need to either turn off the execution policy permanently or temporarily. 


You can check your current execution policy by using the below command:

Get-ExecutionPolicy

Below is my current policy:


As this script is provided by Microsoft we can go ahead and execute it, but at the same time, we don’t want to be at risk by disabling the policy permanently. So to temporarily disable we can bypass the policy just for this script execution using below command. 

Set-ExecutionPolicy -Scope Process -ExecutionPolicy Bypass

After that let's execute the above installation script again. 


Now the installation will start and it will download files required and install. My installation took around 20 mins to complete. 

Opening the installed IDE :

After installation, we need to write the python scripts somewhere and for that, we will use a IDE jupyter-notebook. IDE(Integrated Development Environment), in simple terms it’s an application for writing and testing code. One advantage of it is we don’t need to install the application and we can write code directly. Example “https://rextester.com/l/sql_server_online_compiler” this is one of the SQL Server IDE, in this, we can directly write and test SQL queries. 


Similarly, Jupyter is one of the Python IDE which will be useful in writing and testing python code. There are many other Python IDE’s as well. When we select Microsoft learning Services during SQL Server installation, the jupyter notebook also will get installed automatically. We will use this IDE to run the python scripts. To open it go to the ‘C:\Program Files\Microsoft\PyForMLS\Scripts’ location (this is the default installation folder of the above package) and double click on ‘jupyter-notebook.exe’ or open the Jupyter-notebook using below command


This opens a new browser window like this:


Now let’s open a new notebook like below to write our python scripts:


Script Execution:

I already created a database named “TestScript” in my instance and it has a table named “PythonTestData” with below 3 rows in it. 

The output from SSMS:


Now let’s write our first python script. Our goal is to print the “PythonTestData” SQL table rows through a python script. 


import pyodbc #importing python ODBC module, which is required for accessing ODBC databases.
#Below we are creating a connection string with driver type "SQL Server", "Server" our instance name.
con_str = "Driver=SQL Server;Server=<Instance Name>;Database={0};Trusted_Connection=Yes;"
con_str = pyodbc.connect(con_str.format("TestScript"), autocommit=True)
#Creation of cursor
cursor = con_str.cursor()
cursor.execute("SELECT * FROM PythonTestData")
rows = cursor.fetchall()
#Using for loop to retrieve all the rows from table
for row in rows:
    print(row.col1)


Now copy this script in the jupyter-notebook we opened earlier and execute the script by clicking on the symbol. 


Script output in jupyter notebook:


Once the script will execute we can see output which displays all the 3 rows of the “PythonTestData” table. We have successfully fetched data from the SQL Server table using a python script. 

This is a very basic and first step in running python scripts on SQL Server tables (i.e., on relational data). These Python packages and modules are used in machine learning algorithms for performing image analysis, text analysis, also used in visualizations, data transformations, manipulations, and so on. 

Let me know in the comments section below which machine learning modules\functions you already used and how they are helpful.


Thanks VV!!


#python #sqlserver #machinelearning #jupyter-notebook #jupyter

Monday, May 4, 2020

How to run python scripts from SQL Server.


To run python or R language scripts through SSMS we need to install Machine Learning Services during the SQL installation. We will discuss in a later section how to install Machine Learning Service. Machine Learning Service has been introduced from SQL Server 2016 version which helps in processing R language scripts. From SQL Server 2017 version it has the capability to execute the Python scripts as well.

A brief introduction to R, Python, and Machine Learning Services:

R and Python both are free and open-source programming languages used for data analytics. R mainly used for statistical analysis and Python is more of a general-purpose programming language. Both have large communities that keep adding new libraries or tools regularly. Python is one of the most in-demand programming languages nowadays and most of the data scientists use R language for their analysis. So, in short, both have a huge demand in the market now.

On the other hand, Machine Learning Service is a feature of SQL Server which helps in running R or Python scripts. This mainly helps in performing data analytics on the data residing in SQL Server. From SQL Server 2016 version Microsoft has introduced a concept called extensibility framework, this allows us to run R scripts and from SQL Server 2017 this framework has the capability to run Python scripts as well.

Installing Machine Learning Service:

It is easy to install Machine Learning Service along with SQL Server. While installing SQL Server, in the “Feature Selection” window we have to select below “Machine Learning Services (In-Database)” options while performing the installation. Here I want to run only Python scripts so I have checked only the “Python” box. After this proceed with normal installation clicking on “Next”.


In “Consent to install Python” window, click on “Accept” and click on “Next”. This will install the necessary pre-requisite.


That’s it after clicking on the “Install” Machine Learning service feature also will get installed along with SQL Server instance.


How to run Python scripts:


There are two ways to execute Python scripts using Machine Learning service.

  1. We can run directly from SSMS using the “sp_execute_external_script” stored procedure.
  2. We can use Python client for writing scripts and then push them to remote SQL Server.


Run directly from SSMS using the “sp_execute_external_script” stored procedure:

This is the most commonly used method because it is easy to use compared to another method. We will execute a simple “c=a+b” script.

Before executing Python scripts make sure below 2 options are enabled.

  • Make sure the SQL Server LaunchPad service is running.
  • ‘external scripts enabled’ option is enabled through ‘sp_configure’.

Now we will run a simple addition python script through SSMS. In the below script, we are passing values ‘1’ and ‘2’ to ‘a’ and ‘b’ variables and sending the result value to ‘c’ and finally printing the value of ‘c’.


EXECUTE sp_execute_external_script @language = N'Python'
    , @script = N'
a = 1
b = 2
c = a+b
print(c)'


If there are no issues we should see output like below: 

We should see the output as ‘3’, as a+b which is 1+2 gives ‘3’ in the output section.


We have successfully executed our first python script that too through SSMS.

Pre-requisite Testing:

For testing purpose, I have stopped SQL Server Launchpad service and ran the above script again


“SQL Server Launchpad” service manages and executes external scripts. If SQL Server was not able to communicate with the “LaunchPad” Service we will receive below error.


In the same way, if ‘external scripts enabled’ option is not enabled through ‘sp_configure’ before executing any external scripts, in our scenario our Python scripts will receive below error:


The other option to execute python scripts using python client which we will discuss in another article.

Let me know in the comments sections below if you have started using python through SSMS or python client already and for what sort of tasks you are using.


Thanks VV!!


#python #sqlserver #SQL #externalscripts