In
this article, we will see how to create an Azure SQL instance and how to create
an empty Azure SQL database. Here we will create an Azure SQL instance named ‘databasemigration’
and then we will create an Azure SQL database named ‘AdventureWorks2017’ in it.
I already have a resource group named ‘DBMigration’ in which I will create these resources. If you don't have a resource group first you need to create one.
Resource Group:
If
vegetables are assumed as resources then the resource group is like a vegetable box
that can contain different vegetables. As in a vegetable box, we can keep
different vegetables the same way, a resource group can contain different resources
in it like virtual machines, SQL instances, databases, and so on. It is up to us which resources to be kept in which resource group. Here we will not discuss how to create a resource group.
Creating new “Azure SQL Server”:

In
search, search for “Azure SQL” and select it


Now
Click on “Create”

In
the next page click on “Create” under “SQL Databases”

Under
“Resource Group” if the resource group doesn’t exist create a new one. I have
selected a resource group named “DBMigration” which I already have

In
“Server” space click on “Create new”


Enter
the ‘Server name’, here I am creating a SQL server named “databasemigration”
and create an admin login under the “Server admin login” section, here I am creating
a login named “azureadmin” and provide a password this would be the administrator login for the SQL Server. Select the location of the
server, I want to store all my resources in the same location, so I am
selecting the “Central US” location to store all the resources. And click on ‘OK’.

Creating Azure SQL
Database:
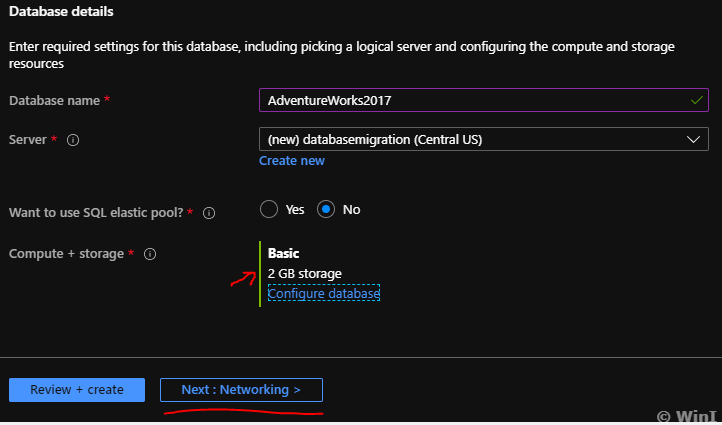
Now
the server gets created, mention the database name as “AdventureWorks2017” in the 'Database name' section and
select the required “Compute+storage” by clicking on “Configure database”
option. In this "Compute Storage" option, we can select which tier, total size, and DTUs, in simple terms we can select the required storage and performance options.

We
will have the flexibility to select the number of DTUs required and the maximum size of
the database. As I want to create a simple database I will choose the minimal size
and DTUs required. Click on the required Tier and after selecting the required size click on 'Apply'. So, I am selecting a ‘Basic’ tier with 5 DTUs and max database size as 2 GB.


Next
Click on Networking
We
can connect to the server we created either publicly by using ‘Public endpoint’
or we can connect privately by using ‘Private endpoint’. Here let's select the
‘Public endpoint’, so that we can access using the public endpoint.

Under
‘Firewall rules’, select ‘No’ for “Allow Azure services and resources to access
this server” which is not required for us at the moment, select “Yes” for “Add current client IP
address”

Click
on “Additional settings”, in additional settings under “Use existing data”
select “None” as we want to create an empty database. If we select ‘sample’, the database will be created with sample tables and we can select the ‘Backup’ option if we want to create the new database by restoring any of the backup available on any of the Azure
regions. Leave ‘Collation’ to the default value and click on ‘Tags’

Leave
tags empty for now and click on ‘Review+create’

In
the final window we can see all the options we selected, we can also see how much this database and server is going to cost for us. Cross-check all the options
and click on ‘Create’

Now
we can see deployment is in progress

Once
deployment is complete we can see a new server named ‘databasemigration’ and a new database named ‘AdventureWorks2017’ got created in the location ‘Central
US’ we selected.

Now
go to the ‘Home’ page of the Azure portal and click on ‘SQL databases’, now we
can see the new database 'AdventureWorks2017' we just created

How to query Azure
SQL Database:
Click
on the database ‘AdventureWorks2017’ database which we just created and we can
different options available on the left side and click on ‘Query editor(preview)’ and here
enter the admin login credentials which we created earlier ‘azureadmin’ during server creation and
Click on ‘OK’.


Now
new query window will open for the database and let's run a simple query to
check the number of user objects in the database

The
output should be ‘0’ as we created an empty database.
We can use the Azure Data Studio (ADS) to connect and query this newly created Azure SQL database. Read here: How to use ADS.
So to recap, in this article we discussed how to create a new Azure SQL database server, new azure SQL database, how to connect and query the azure SQL database.
In the next article, we will see how to migrate an on-premise SQL Server database to the Azure SQL database using online migration with minimal downtime.
Thanks
VV!!
#azure #azuresql #azuresqldatabase #sql #azuresqlserver #AzureSQL
No comments:
Post a Comment