Monday, June 29, 2020

Azure SQL Database vs Azure SQL Managed Instance vs SQL Server on Azure VMs.


While migrating on-premise SQL Server to Azure SQL platform we have 3 options to choose from Azure SQL family.


·         Azure SQL Database.

·         Azure SQL Managed Instance.

·         SQL Server on Azure VMs.


Depending on the requirement, each of these is best suited for different scenarios. 


Azure SQL Database:


Azure SQL Database option gives us a single database in the Azure cloud, which is similar to a SQL Server database. It supports all the features of the SQL Server database. With the Azure SQL Database option, we are responsible only to manage and optimize the database, the server and instance are managed by MS. We will get the latest stable version of SQL Server as Azure SQL Database. We can process both relational and non-relational data with this database. It falls under Platform as a Service (PaaS).


As we can see this option is best suited when we don’t want the overhead of maintaining and managing underlying instance and OS. Also at the same time, this option is best suited when we want to use only database scoped features. This option does not suit if we want to use instance level features like SQL Server Agent and so on. We need to use alternatives like Elastic jobs in-place of SQL Server jobs if we want to schedule any activities when we opt for Azure SQL Database.


Elastic Pools:


Elastic Pools is a collection of several Azure SQL Databases. This option is suited when we have applications relying on multiple databases with unpredictable usage demands. In short, when we have several databases with fluctuating loads instead of allocating resources to each single database and managing them we can add all those databases under a single pool and allocate resources to the entire pool. This helps hugely while managing the resources of all the databases in the pool. All the databases within the pool will share the resources of the pool and will use the resources whenever required. If we notice there is a resource crunch on the overall pool itself, we can allocate more resources to the pool as per the demand.


This option mainly helps in avoiding over and under allocation of resources than required along with providing all the Azure SQL Database advantages which in turn saves costs included.


Azure SQL Managed Instance:


Azure SQL Managed instance option is suited when we want to migrate our entire SQL Server instance to the Azure cloud. As we know with Azure SQL Database we can use all the database related features, with this managed instance option we can use instance level features along with database-level features. This option helps in doing a lift and shift migration to the cloud with minimal to no changes to the applications. With this option, we will not have the responsibility of managing and maintaining the underlying OS.


SQL Server on Azure VMs:


This option is suited when we want complete control of the environment like OS, SQL instance, and the databases. We will have to manage and maintain the entire infrastructure. We will be responsible for installing and configure SQL instances and creating / managing required databases, SQL jobs, HA features, and so on. With this option, we can lift and shift the applications and databases with minimal to no changes to the existing on-premise environment.

These features will give us flexibility in selecting and managing only the required features, like if we don’t want to use SQL Server Agent jobs then we can choose Azure SQL Database or if we don’t need to use linked server then we can use Azure SQL Database or Elastic pools or if we don’t want to manage the underlying OS but want to use SQL Server instance level features then we can choose SQL Manage instance or if we want to complete control of SQL Server instance and the underlying OS then we can choose SQL Server on Azure VMs and so on.

Depending on the requirements and budget, we can choose only required features which in turn helps in saving costs and will save the time of the support groups.


Below table outlines the comparison of all these options as of today:


Azure SQL Database vs Azure SQL Managed Instance vs SQL Server on Azure VMs


This is a high-level comparison of each of these options and there are many more differences in each of them. To know the differences between all the features and administration differences of each of them in detail refer below links.


Thanks VV!!


#azure #azuresqldatabase #azuresqlmanagedinstance #IaaS #PaaS #sqldatabase #cloudmigration #sql #elasticpools #Azure #AzureSQL

Friday, June 19, 2020

How to perform offline migration of a SQL Server database to Azure?

As discussed in the previous article Data Migration Assistant (DMA) is one of the tools which we can use to assess a database and it can also migrate the database. DMA is one of the tools for performing Offline database migrations. So before performing a production database migration using DMA we need to schedule sufficient maintenance windows and thorough testing in a lower environment. Here we will migrate an on-premise database named “AdventureWorks2016” to Azure SQL Database using DMA. Details of DMA and different migrations are discussed in this article..

I have already downloaded and created the “AdventureWorks2016” database. You can read this article to get details from where this database can be downloaded.

Download DMA:

We can download DMA for free from here.


Install DMA:

Installing DMA is quite easy just need to click on 'Next', 'Next' as shown below. 


Once installation completes successfully, we should see below shortcut on the desktop.


Assess A Database using DMA:

Here first, we will evaluate if my database is migrated from a SQL Server database to Azure SQL Database, what existing features might not work in Azure, what issues the database might face, and at the same time DMA will also suggest remedies for the issues identified.

Open DMA by double-clicking the icon. Now click on ‘+’ and create a new project as shown below


Enter the project name as “AssessDB”, assessment type as ‘Database Engine’. Select the desired source and target server. I am selecting the source server type as “SQL Server” and Target Server type as “Azure SQL Database” as shown below


As of today, we can assess if the source database will have any compatibility issues if migrated to azure, and also we can check if any of the existing features of the source database will have issues if migrated to azure. Let’s check both the options as shown below


Now connect to the source SQL instance using either Windows or SQL authentication:


Now select the database which we want to assess. Here we are assessing “AdventureWorks2016” database, so select it and click on 'Add':


Now Click on ‘Start Assessment’ and the assessment will start


Once the assessment is completed in the results we will have information about different issues we might face if we migrate the current database to azure. As you can see I already have some SQL Server jobs on source database hence the report is saying there are no SQL Server Agent jobs in Azure. So if these jobs are critical and required to be run after migration also we need to plan for a fix for this. Either we can select another target platform like SQL Managed Instance or SQL on Azure VM (Iaas) or use Elastic jobs. But in my case, this is just a test environment I will ignore the warnings and proceed.


Same way under ‘Compatibility Issues’ it says ‘Full-Text’ index has changed and so on.


So we need to review this Assessment report thoroughly and need to apply fixes for any issues identified or might need to exclude any of the objects\components from source, if we don’t need to use them in Azure and so on. We can save or export this report.

Migrate Database using DMA:

Once database assessment is completed next we can use DMA itself to migrate the database to Azure.


Now click on ‘+’ symbol again and create a new project named “MigrateDB”. Same as we did for assessing the database select the source and target servers. In the “Migration scope”, we can choose what we want to migrate either only data or only schema or both schema\data. Here we will migrate both the schema and data, so I am selecting the option ‘Schema and data’.


Now select the source server and authentication type either windows or SQL authentication


Then select the source database which we want to migrate. Here it is ‘AdventureWorks2016’ and click 'Next'


Connect to the target Azure server using SQL authentication.


Now select the target database to which we want to migrate the data and schema of our source server. I have already created an empty Azure SQL database named ‘AdventureWorks2016’ and I will migrate my source database to this. Read here to know how to create an empty Azure SQL database.


In ‘Select Objects’ page we can select what all objects we wish to migrate.


Also on the same ‘Select Objects’ page, we can view object-specific issues that might encounter after migration. Like in the below screenshot you can see ‘HumanResources.JobCandidate’ table has Full-Text index on a column and DMA suggests ‘we can migrate this object but might face issue related Full-Text’. So we can take necessary actions and alternatives as per suggestions provided by DMA. Then click on ‘Generate SQL script’.


In this page ‘Script & Deploy Schema’, first SQL script will be generated for all the objects selected on the previous page. 


Once the script is generated we can click on ‘Deploy Schema’ to start deployment of the schema.


Once schema deployment is completed we can either Redeploy the schema or start migrating the data. Click on ‘Migrate data’


In the ‘Select tables’ page, select the tables to migrate. Here we will migrate all the tables. After selecting tables click on ‘Start data migration’The migration process will start and we can view progress as below


Once entire migration is complete let's connect to the Azure database server using ADS(Azure Data Studio). Now we can see the schema and data from our source database has been migrated to my Azure SQL database ‘AdventureWorks2016’.


Once we verify and make sure the entire source database has been migrated completely to the Azure SQL database and after applying fixes if any on the Azure SQL database now the application connections need to be diverted from on-premise SQL database to Azure SQL database. After diverting the connections once thorough testing is done that marks the completion of the migration.


Note: Database Migration Service is one of the most widely used tools for performing both Offline\Online migrations.


Thanks VV!!


#azure #databasemigration #migration #database #sqlserver #sql #Azure #DMA #offlinemigration #dbmigration #AzureSQL

Monday, June 15, 2020

How to perform migration of SQL database to Azure with minimum downtime.


As discussed earlier there are different methods of performing both ONLINE\OFFLINE database migrations. When we need to migrate databases with minimal downtime we will opt for online migration. In this article we will see how we can perform online migration of an on-premise SQL Server database to Azure SQL Database using Transactional Replication.

Below are the steps we will follow for migrating the database:

·         Create an On-Premise SQL Database. 
·         Create an Azure SQL Instance. Read this on how to do this.
·         Create Azure SQL Database. Read this on how to do this.
·         Create Transactional Replication between On-premise and Azure SQL database.
·         Verify all the objects migrated to Azure.
·         Remove transactional replication.


Create an On-Premise sample SQL Server Database:

All the sample databases which we can use for testing and learning can be downloaded from hereI have downloaded and created the “AdventureWorks2017” database in my local instance. 

Change the database owner of the on-premise database ‘AdventureWorks2017’ to ‘sa’

Create Transactional Replication between On-premise and Azure SQL database:

Before configuring replication between on-premise and Azure SQL database we should keep in mind below are the limitations as of till date:

·         Only Transactional Replication and Snapshot Replication can be configured between on-premise and Azure SQL database. Other types of replications are not supported.
·         The On-premise database acts as both publisher and distributor.
·         Subscriptions should always be PUSH SUBSCRIBERs.
·         Replication can only use SQL authentication to connect to the Azure database.
·         Replicated tables must have a Primary key.

Connect to the on-premise SQL instance. Expand the ‘Replication’ tab and right-click on ‘Local Publications’ and select ‘New Publication’ as shown below:


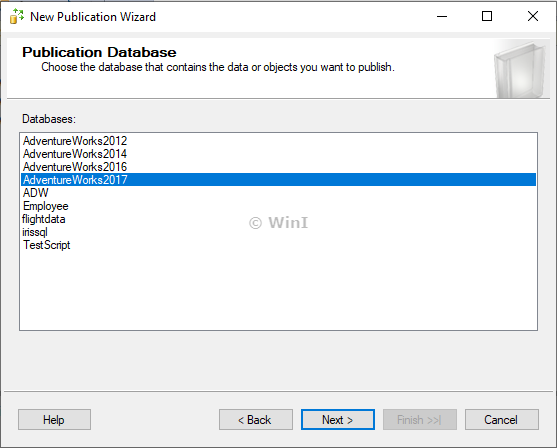
Select the database “AdventureWorks2017” which we want to replicate to Azure.


Select ‘Transactional publication’ and click on ‘Next’


Now select the objects that need to be replicated. Here we will replicate only 5 tables of ‘AdventureWorks2017’ database instead of all the objects. After selecting all or required objects click on ‘Next’


In next window we can select the rows of a table that we don't want to replicate, we will not filter any rows and click on ‘Next’


In this window select ‘create a snapshot immediately’ option and click on ‘Next’


Click on ‘Security Settings’ and as this not a production environment I will select ‘Run under the SQL Server Agent service account’ and in the ‘Connect to the Publisher' section either we can impersonate the account or use an admin login. I have created an administrator SQL login named ‘azureadmin’, so I will use the same


Select ‘Create the publication’ and click ‘Next’


Give the publication a name and click on ‘Finish’. For easy identification, I am using my database name itself as a publication name also.


Now right-click on ‘Local Subscriptions’ and select ‘New Subscriptions’ 


and select create the subscription


in next window select Publisher and the publication created earlier


Select ‘Run all agents at the Distributor’ and click ‘Next’


Click on ‘Add SQL Server Subscriber’ and enter the azure connection string on which we have the empty database created with the admin login credentials


Even though the connection string we provided is correct, we may receive below error after clicking on 'Connect'


Here the issue is we need to include ‘secure’ in the connection string like below 


Now we should see ‘AdventureWorks2017’ database under ‘Subscription Database’ and Click on ‘Next’


In this window click on the 3 dots and select the required options for Distribution agent and Subscriber as below


In ‘Synchronization Schedule’ we can select ‘Run on-demand only’ and click Next


Next select ‘Immediately’ for ‘Initialize when’ option


Select ‘Create the subscription(s)’ and click on ‘Finish’


Now we can see replication set up completed successfully.


Now connect to the Azure SQL database server using the connection string and check we can see all the selected objects have been replicated to the Azure SQL database. Here I have connected to the azure instance using SSMS.


Now after making sure all the objects got replicated to Azure then we need to divert the application connections to point to the Azure SQL database instead of the on-premise database. Once the connections are diverted then we need to validate all the transactions got replicated successfully. Once we are sure everything got replicated then we can disable the transaction replication on the on-premise database.

As we can see in the online migration, the duration the database will be unavailable is during the time when application connections are being diverted from on-premise to Azure.

In next article, we will see how to migrate an on-premise SQL Server database to the Azure SQL database using offline migration.


Thanks VV!!


#azure, #azuresqldatabase #databasemigration #cloudmigration #sqlserver #onlinemigration