- You
cannot restart Azure SQL database.
- You
cannot see the database files.
- You
cannot shrink the database log files.
- You
cannot backup the Azure SQL database manually. The only option is to Export
the Azure SQL Database as a bacpac file.
- You
cannot use Windows Authenticated users directly first need to synchronize AD with Microsoft Entra ID.
- You
can use Transactional Replication , Data Migration Service , bacpac file ,
BCP to migrate SQL Server on-prem database to Azure SQL Database.
- You
cannot create linked service directly between two Azure SQL
Databases. You need to use either Azure Data Factory or Azure Synapse
Pipelines.
- You
can use built-in performance tuning features in Azure SQL Databases
which are not available in on-prem SQL Server.

- You
can easily identify and apply missing indexes in Azure SQL Databases which
is not so direct in on-prem SQL Server.
- Microsoft
Copilot in Azure is now integrated with Azure SQL Database. Currently it's
in preview but in few days you can simply say like "My database is
slow" and it will give details like why it is slow and what are the
fixes.
- In
few days you may need not write any queries for details... you can simply
give prompts like " Are there any deadlocks in the database? " ,
" who are currently actively connected to the database? " and so
on. These features are currently can be tested using copilot which is in
preview.
- You
cannot use Azure Data Studio beyond Feb 2026. Visual Studio Code is the
next stop.
- Database
Watcher is going to be one stop in-depth monitoring solution for Azure SQL
Database and Azure SQL Managed Instance.
- You
need to use the feature Failover Groups if you want to manage the
replication and failover of Azure SQL database(s) from one region to
another Azure region.
- You
do not have control over Azure SQL Database maintenances but you can
configure notifications so that you will get notified about the
maintenance events of your Azure SQL Database.
- As
of now each new Azure subscription includes 10 serverless databases. Each
database comes with a complimentary allocation of 100,000 vCore seconds of
compute, 32 GB of data storage, and 32 GB of backup storage every month,
for the lifetime of your subscription.
Monday, July 14, 2025
16 Azure SQL Database Critical Concepts You Must Know Before Deployment


Monday, July 7, 2025
How to create firewall rules for Azure SQL Database?
After
creation of Azure database server and the Azure SQL database as discussed in
previous articles the next steps are 1) add firewall rules to the database and
2) allow the permission for other azure resources to access the database.
In
on-prem we have windows firewall which comes into play while accessing the SQL
Server within a windows server, we need to open firewall at server level for
the required servers and ports. Similarly in Azure DB PaaS we have firewall
rules that need to be setup at the Azure database server level which will then
allow access to the databases within that Azure database server from the
required VMs and IPs. We will see how to do that here
To
begin with search for " sql database " in azure portal and click
on " SQL databases "

here we can see all the databases created so far and select the database " asd " which we created previously

when
we go to the database page we can see on the left side “Query editor (preview)”

Once
we click on it on right side there is provision to enter “ Login ” and “
Password ”, lets enter the “sqladmin” login credentials we created during azure
database server creation and click “ OK ”

We
will see errors like below for both SQL Server authentication and Microsoft
Entra Authentication :
Reason: An instance-specific error
occurred while establishing a connection to SQL Server. Connection was denied
since Deny Public Network Access is set to Yes
(https://docs.microsoft.com/azure/azure-sql/database/connectivity-settings#deny-public-network-access).
To connect to this server, use the Private Endpoint from inside your virtual
network (https://docs.microsoft.com/azure/sql-database/sql-database-private-endpoint-overview#how-to-set-up-private-link-for-azure-sql-database).
This is happening because we haven’t allowed access
to the azure database server yet to any of the azure resources. To allow access
we need to go back to azure database server by clicking on “overview” we can go
back to database page first

In the overview page you click on the server name as
highlighted below
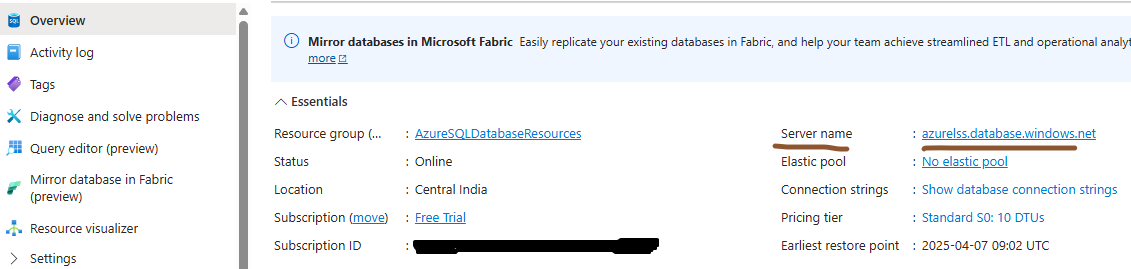
This will take to the database server page, in this
click on “ show network settings ” next to “ Networking ”

This will take us to the “ Networking ” page , in
this page under “ Public access ” check the “ Selected networks ”

Next scroll down and we can see a section “
Firewall rules ” , here we need to click on “ Add a firewall rule ” to add the
required firewall rules

We need to provide below information :
Rule name : name as per your
choice
Start IP and End IP : Here we need to enter IP ranges of the servers.
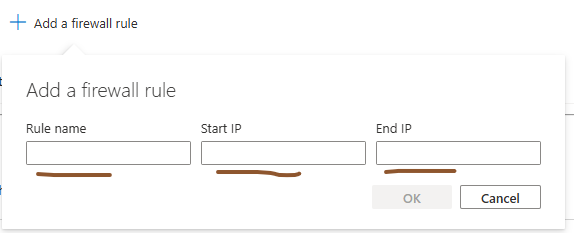
For example : Let’s say we have 20 application servers
from where we need to access Azure sql database. So, instead of creating a 20
different firewall rules we can use their IP address range.
In the above screenshot “Access from App Server” is
my firewall rule name, Start IP is 123.12.12.1 and End IP is 123.12.12.20. So,
this means all the machines between these to IP addresses *12.1 to *12.20 can
access the database.

As I’m testing this from my laptop I will add my
laptop IP to the firewall, to do that I will click on “ Add your client IPV4
address ”. after that click on “ Save ”

Now scroll down in the same page and check the “
Allow azure services and resources to access this server ” box

Now let’s go back to the “ query editor ” in
database page
Here enter the login as “ sqladmin ” and give the
password and click “ ok ”. Note : This we created in previous
article.

Now on right side the query editor will open. We
can type required queries and click “ Run ” to execute the queries. Here I
executed a simple SQL query to check the sys.tables. As there is not data in
the database the result is empty.

To open a new query click on “ New Query”
In
the next article we will see how to create an Azure automation account which
requires to be created for performing any database automation's.
Thanks VV!!
Friday, April 11, 2025
How to convert simple text to video speech using Azure AI ? How to translate an entire video from one language to another language using Azure AI ?
With the amount of money companies spending on AI and the rapid changes happening in AI and the number of industries, fields AI is impacting looks like the transformations it is going to bring is unbelievable. There are 100s if not 1000s of AI websites that can convert text to video, video to text and so on. In this article we will see how to use Azure AI services that can convert the text we have into a audio with an avatar talking and also lets try how an entire video can be translated from language to another language.
We will see below things in this article :
- Creating
Azure AI Service
- Creation
of Speech Service to convert text to video
- Creation
of speech service to translate the audio of a video
First login to the Azure portal and search for Azure
AI and select “ Azure AI Services ”

This will take us to the page having all available
Azure services. Here click on “ Create ” in “ Speech service ” shown below

Which will take us to the “ Basics “ tab in “ create
speech services “ page.
In this page fill all the details like
- Subscription
- Resource
group
Instance Details
- Region
: Based on the task you are looking for select the region. As few regions
doesn’t support some of the features.
- Name
: Give any name. I have given as “ textaispeechservice ”
- Pricing
tier : If you are using free azure subscription it will give two options
Free tier (F0)
Standard S0
Once we use “ Free tier” to create a service it will
not allow us to create another similar service in it and we have to select “ Standard
“ tier.
After selecting the required tier click on next


leave “ Network ” tab with default value and in “ Identity ” tab select “ Status ” to “ On ”
and click Next

leave Tags tab also empty and Click on “ Create ” in
the Review+Create tab

One thing to notice is first it will register
cognitive service which is a prerequisite and then it will create the requested
AI service. Once resource creation is completed click on “ Go to resource ”

In the textaispeechservice page we can check the details of the service like endpoint, API kind, region and so on. Now click on “ Go to speech studio ”

In the speech studio page if we scroll down we can see
numerous AI services like Speech to text, text to speech, translation and speaker
recognition and so on.
Here we are planning to test how text can be converted to speech, scroll down and look for “ Text to Speech avatar ” and click on “ Try out Text to Speech avatar ”

This opens the “ Text to Speech avatar ” page here we can configure on how we want to convert the text. In the “ Avatar ” tab we can select
any of the avatar from the list and I’m selecting one avatar named “ Lori ”


Now if required we can change the background of the
avatar, for testing purpose I’m changing it to some random AI image I generated.
To change the background click on “ background ” and click “ + upload image “
and upload the image

Once image gets uploaded click on the image and the background
changes accordingly

Now scroll-down and in the Language select the
language as “ Telugu (India) ”, here we will convert the Telugu text to Telugu
speech so selecting Telugu. Next we can select what type of voice we want in Voice
it is better to select any Multilingual capable voice so that we can
convert\translate between different languages.

I selected Telugu in language
and Ada Multilingual in Voice.
Now Copy paste the below text in the box and click on Play Audio so that we will get an idea whether the pronunciation is correct or not, slang and so on.
“ నమస్కారం. ఈ చలనచిత్రం ఏఐ ద్వారా సృష్టించబడింది. కేవలం పది నిముషాల్లో దీనిని తయారుచేసారు. ఒకప్పుడు ఇవి తయారుచెయ్యాలంటే చాలా సమయం మరియు ఖర్చు అయ్యేది. ఎటువంటి కోడింగ్ చెయ్యాల్సిన అవసరం కూడా లేదు. ”

Once we are satisfied with the voice then click “
Generate Video ”

This will start generating the video

Once video generation is completed we can test it by clicking play button. To download the generated video click on “ Export Video ” or click on the 3 dots and it will give option to “ Download ” the video.

I have downloaded the video I generated which is below
How to translate an entire video from one language to another language using Azure AI ?
Now the next task is converting a complete video file of different language to our required language. In our case the earlier video we generated is of Telugu language now we will see that video can be translated to English using Azure AI service.
Go back to the “ Speech Studio” and under “ Video Translation
” click on “ Start video translation ”

In video translation page click on “ Create Project ”

Here I’m giving the project name as “ video
translation ” and click on “ browse files ” to upload the required video file.
Here I’m uploading the video which we generated and downloaded earlier

Once video is uploaded scroll-down and in the “ Language of the video ”
section give the original language of the video, in our case it is Telugu. In “
Translate to ” select the language we wish the audio to be translated to, in
our case we want it to translate to English. Next check both the boxes about Acknowledgement
and code of conduct and then click create

This will initiate Video generation and it will take
time and once it completes you can see the video inside your project like below
and click on it to play

Here we can make if any changes required to the video like converting to new language or changing the voice settings and so on. To download the video generated click “ Download ”

Below is the video after conversion from Telugu
language to English
This is just one small capability we tested and once
you go through the Azure AI services page you will realize the numerous
different tasks that can be performed so easily and smoothly that too without
any coding.
If you have already tried any of the AI service let me
know.
Thanks VV!!
Subscribe to:
Posts (Atom)