After
creation of Azure database server and the Azure SQL database as discussed in
previous articles the next steps are 1) add firewall rules to the database and
2) allow the permission for other azure resources to access the database.
In
on-prem we have windows firewall which comes into play while accessing the SQL
Server within a windows server, we need to open firewall at server level for
the required servers and ports. Similarly in Azure DB PaaS we have firewall
rules that need to be setup at the Azure database server level which will then
allow access to the databases within that Azure database server from the
required VMs and IPs. We will see how to do that here
To
begin with search for " sql database " in azure portal and click
on " SQL databases "


when
we go to the database page we can see on the left side “Query editor (preview)”

Once
we click on it on right side there is provision to enter “ Login ” and “
Password ”, lets enter the “sqladmin” login credentials we created during azure
database server creation and click “ OK ”

We
will see errors like below for both SQL Server authentication and Microsoft
Entra Authentication :
Reason: An instance-specific error
occurred while establishing a connection to SQL Server. Connection was denied
since Deny Public Network Access is set to Yes
(https://docs.microsoft.com/azure/azure-sql/database/connectivity-settings#deny-public-network-access).
To connect to this server, use the Private Endpoint from inside your virtual
network (https://docs.microsoft.com/azure/sql-database/sql-database-private-endpoint-overview#how-to-set-up-private-link-for-azure-sql-database).
This is happening because we haven’t allowed access
to the azure database server yet to any of the azure resources. To allow access
we need to go back to azure database server by clicking on “overview” we can go
back to database page first

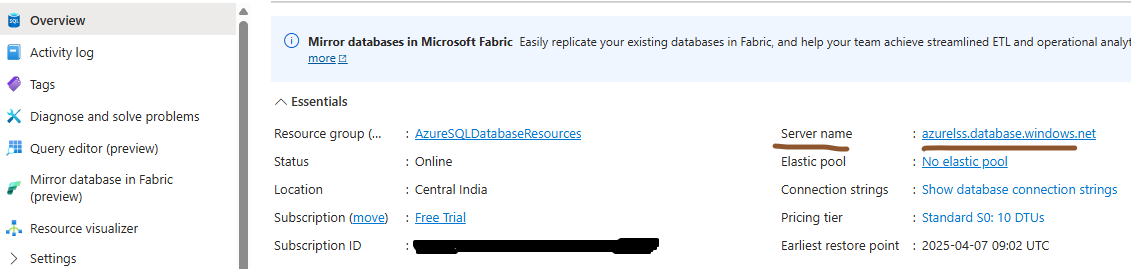
In the overview page you click on the server name as
highlighted below
This will take to the database server page, in this
click on “ show network settings ” next to “ Networking ”

This will take us to the “ Networking ” page , in
this page under “ Public access ” check the “ Selected networks ”

Next scroll down and we can see a section “
Firewall rules ” , here we need to click on “ Add a firewall rule ” to add the
required firewall rules

We need to provide below information :
Rule name : name as per your
choice
Start IP and End IP : Here we need to enter IP ranges of the servers.
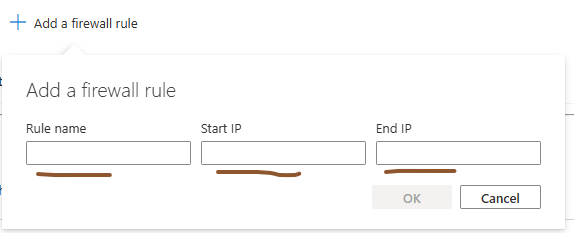
For example : Let’s say we have 20 application servers
from where we need to access Azure sql database. So, instead of creating a 20
different firewall rules we can use their IP address range.
In the above screenshot “Access from App Server” is
my firewall rule name, Start IP is 123.12.12.1 and End IP is 123.12.12.20. So,
this means all the machines between these to IP addresses *12.1 to *12.20 can
access the database.

As I’m testing this from my laptop I will add my
laptop IP to the firewall, to do that I will click on “ Add your client IPV4
address ”. after that click on “ Save ”

Now scroll down in the same page and check the “
Allow azure services and resources to access this server ” box

Now let’s go back to the “ query editor ” in
database page
Here enter the login as “ sqladmin ” and give the
password and click “ ok ”. Note : This we created in previous
article.

Now on right side the query editor will open. We
can type required queries and click “ Run ” to execute the queries. Here I
executed a simple SQL query to check the sys.tables. As there is not data in
the database the result is empty.

To open a new query click on “ New Query”
In
the next article we will see how to create an Azure automation account which
requires to be created for performing any database automation's.
Thanks VV!!
No comments:
Post a Comment