We all know Azure marketplace have wide variety of
images with different combinations like different OS versions, different OS+DB
versions and so on. Let’s say we have a customer VUT and all the Virtual
Machines created for this customer should have some applications running in
them as per their policy or requirement and installing and configuring 100s of them
takes some time. So instead of installing the required applications manually every
time on all the VMs we can create our own VM Image just like Azure marketplace
image and use our VM Image across the company to create new VMs which will have
the required applications comes along with image.
Another use can be when we have to create multiple VMs with same configurations like OS disk or both OS and data disks we can use VM Image concept in Azure. This helps in scenarios like all the VMs in an environment should have similar configurations for example all the test VMs should have identical configurations then instead of creating each VM manually and configuring them we can use VM Images.
How to create a Azure VM Image.
In this article we will see how we can create VM Image
and in the next article we will see how an VM image can be shared across all
the subscriptions of an organization.
- Login to Azure portal and search for ‘Virtual
Machine’

- Select the VM for which you want to create an
image. In my case I want to create an image for virtual machine named
‘VM1’.

- Click on VM1 and you can see settings of VM1. In
the same ‘Overview’ click on ‘Capture’

- ‘Create an image’ page will open and here enter
Resource group details where you want create the image and select ‘Yes,
share it to a gallery as a VM image version’.

- We can store the images in a Gallery which helps
in sharing the image across the company and across the regions. This
gallery in simple terms acts as a repository.
Create an image gallery to store the VM image. If gallery doesn’t exist
already in the resource group click ‘Create new’.

- Give ‘VMIG’ as image gallery name and click ‘OK’.

- You can check the option ‘Automatically delete
this virtual machine after creating the image’ if you want to delete the
source VM once the image creation completes. But it is recommended to have
the source VM in place even after image creation.

- Azure compute gallery supports 2 Operating System
States. Generalized and Specialized. Generalized means the machine and user
specific information will be removed from the VM before creation of the
image and in Specialized state this information will not be removed. Both
the options have their own advantages and disadvantages. Specialized state
will not have osprofile in it, osprofile helps in passing sensitive
information to VM via secrets but advantage of specialized VMs is they can
start and run faster than the Generalized VMs. So as per your requirement
you can choose suitable option.
Here I select Operating system state as ‘Generalized’.

- Create VM image definition at ‘Target VM image
definition’. Here I’m giving name as ‘VM1Image’. Select publisher and
other details as shown below and click ‘OK’.
Image definition basically will have details about the image like OS
details, SKU details, VM generation and so on. This information helps in
logical group of images and also helps the user who is using this image to identify
the type of image being used.


- Under Version details, we can give ‘Version
number’ for the image, I’m giving as 1.1.0 and leaving other details
empty.
Versioning of image helps in segregating the images. For example, we can
have dedicated version for all production images, another dedicated versioning
for development images. Also, versioning helps in identifying the older and
newer versions.

- ‘End of life date’ this option helps in making
user aware if the image they are using is latest one or old one. VMs can
still be created after the end-of-life date of the image but it will act
as an indicator for the user to know the image is outdated. I’m leaving this
as empty.

‘Shallow replication’ option creates
the image faster as it will not copy the image. This option can be selected if VMs
have larger disks as image gets created faster but you can’t deploy large number
of VMs concurrently if this option is selected. It is recommended to check this
option for development and test environment. I’m leaving this option unchecked.

- We can copy the image we are creating to multiple
regions using ‘Replication’ option. To how many regions we want it to be
replicated and to which regions it has to be replicated can be configured
under ‘Replication’.
Under ‘Replication’ I’m giving ‘Default replica count’ as ‘1’ and selecting ‘(Asia
Pacific) Central India’ so the image will be replicated to this region.

- Now click on ‘Review+Create’.


- Wait for the image to be created.

- Once the image creation is completed click on ‘Go
to resource’ it will take us to the image we created.

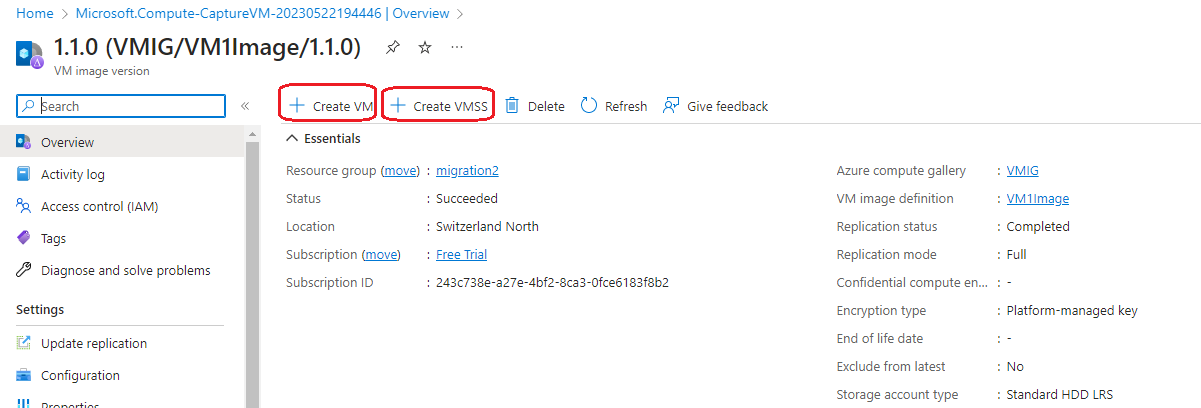
- In ‘Overview’ section of the image you can see 2
options like ‘Create VM’ , ‘Create VMSS’. We can use these buttons to
create a new VM or VMSS using the image we created. Click on ‘Create VM’.
- If we click ‘Create VM’ it opens ‘Create a
virtual machine’ page and here if you scroll down you can see under ‘Image’
section the image we just created already selected.

- You can fill the other details and simply
click on ‘Review+Create’ and a new VM gets created which will have same
configuration as the image we used.
Hope this article helped in learning how to create our
own VM image in Azure similar to Azure marketplace image. Share your inputs in
comment section below.
Thanks VV!!
No comments:
Post a Comment